Amazon EC2 compute cloud is the new trend of the hosting world. EC2’s ability to scale and flexibility has become the key for medium to large scale enterprise users to get started with the cloud, You can host your blog on it, or you can build your own supercomputer out of it, there are unlimited possibilities inside this vast platform. However its not for the faint hearted. While Amazon gives you a big playground its also little bit hard to configure and setup until you get used to it. Its not your regular VPS provider, all the terms and techniques you use, are different here. So with these guides I hope to explain you how to get started with Amazon EC2 and using the other related services from aws.
This will be Part 1 of the whole guide, Part 2 will cover about using key pairs to login ( amazon uses ssh key files instead of giving you root user name and passwords ) . Part 2 is for beginners and you can sustain with only this part of the guide if you know your way around how to login with your ssh config file.
On this guide we will
- Setup a new EC2 instance
- Add an Elastic IP to the EC2 instance
- Install LNMP Nginx autoinstaller to be able to run web sites on it
-
Setup your EC2 virtual server
Login to your Amazon EC2 console and click “Launch Instance” and then a wizard will pop up asking how you want to configure the instance, we will use the “Classic Wizard” right now to cover the whole process to press “Continue” button
And then we will get the next process of the wizard, this is to choose the AMI ( amazon machine image ), this is like the OS image which you use in regular VPS services. You can select which OS to install and under the description you can see the root device size of the image, As the name tells us , this is the root device size of the virtual server when its launched, You can add EBS ( Elastic Block Storage ) volumes to your instance and that will be covered later part,
So lets choose Ubuntu 12.04 32bit edition since we are going to install LNMP .
Ill choose 32 bit edition for now as I don’t need 64bit version for my instance. And click “select”
On next step you will get to select the size of your virtual server and the availability zone ( the data center which you want to put it ). As you can see below I have chosen to launch a “small” instance which gives 1.7Gib of RAM and since I don’t have any location preference to place my instance, I have chosen “No preference” under availability zone
Click “Continue” and then you will be presented with another screen to define kernel,RAM disk ID’s and cloudwatch monitoring and stuff, you can leave this as it is and press “Continue” and the next step of the wizard lets you to review the storage volumes of your instance, as this is a beginners guide we dont want to mess with that, so click “Continue” and
Next screen will let you to name the instance, this is useful when you have lots of instances, click “Continue” again
Then you will be presented to create a key pair to login to your instance
You need to create a new key pair in order to login to SSH console, so give it a name and click create and download, This file is very important to login so save it somewhere, then click “Continue”
Next you will be presented to create a security group, this is same like you are configuring a firewall, you need to open up ports from here to access your server from outside, so lets choose “Create a new security Group”
As you can see from above screenshot, I have named it and added 2 rules to open up ports for SSH port 22 and HTTP port 80. So after that click “Continue” on next step you will get to review the information you entered and then click “Launch” button to launch your instance on the cloud
It will take about a minute or two to be launched and then you can review and see whats happening on instance section of Amazon EC2 console.
As you can see my instance is now running fine and its ready to go, However as this only got a sub host name or ec2 cloud, we will need an IP address to simplify this,
-
Add an Elastic IP to the EC2 instance
To do this go to Elastic IP section of the EC2 console and click allocate new address and then select EC2 and click allocate. then your account will get a new IPv4 address and right click on it and then click “associate” to allocate it with our EC2 instance
after clicking Associate you will be presented to choose your EC2 instance and on that you need to select your instance and click “Yes Associate” to bond the IP address with your EC2 instance.
Thats it
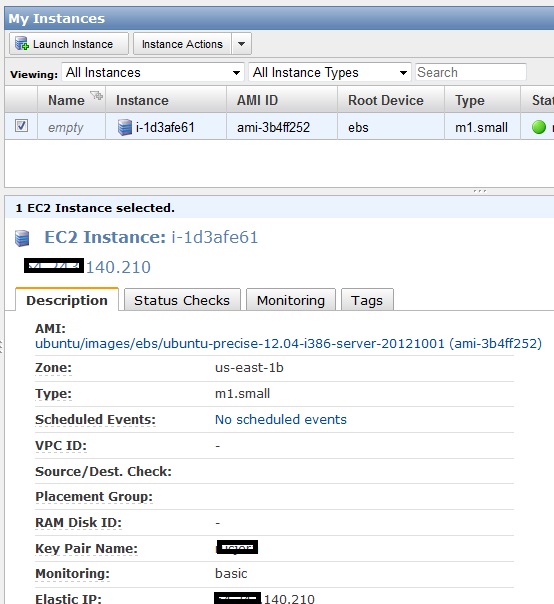
Now you can navigate back to Instances section and click on your instance to see the details
you can see the elastic IP is now associated and the other details on this page.


{ 0 comments… add one now }